Scaling Agile – Slice and Understand Together
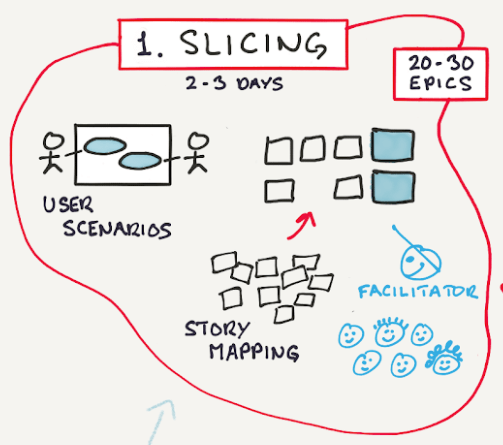
Getting started
The only right way to start a new development effort is to get slicing and a common understanding in place – and it is very difficult to do.
Perhaps you might think you have it in place, and then you start planning and developing, and find out that actually you did not have a deep enough common understanding. What I’ve learned over the years is that the only way to find out if you’re actually ready for planning and developing is by starting planning and developing. And chances are the first time(s), you’re not ready.
That’s okay, or at least it is very normal. Then you know that for next time. You have learned something. You’ve also created awareness for everyone that we need to spend more time and effort on this next time.
Slicing
Let’s go deeper into what we mean by “slicing.”
After we have an overall idea of the value we want to deliver, it’s time to break up the work into smaller chunks that we call epics; it’s time to do the slicing.
And just like there are many wrong ways to cut a cake (horizontally, too big/small pieces) – and only one right way (vertically from the center out to the edge and down), there are also many wrong ways to organize the requirements, and only one right way.
There are (at least) three ways people break down a system into epics:
- Waterfall (wrong)
- Layers (wrong)
- Slices (right)
In summary, we want a breakdown of all the work in smaller pieces. We call the pieces epics, and we want each epic to be one slice of the system.
Waterfall
Waterfall is a step-by-step approach with handovers between parts of the project. Here’s an example, a waterfall way of looking at developing a new ATM:
- Analyze banknote combinations, that people prefer
- Design overall UX principles
- Write the Project Initiation Document (PID)
- Set up test strategy
- Customer focus group interviews
- Templates for status reporting
- Technology assessment
- Review and approve PID in steering committee
- Overall technology
- Prep and run project kickoff
This is not the way to go.
Don’t get me wrong. All of these things are relevant and important. And often we need to do some initial thinking and shaping the product before we start building it. Some refer to this initial work as ”sprint zero.”
However, the above is a list of activities, not a list of things to develop to create customer value. Experience (and Agile) has taught us that having ”pieces of things you want to develop to make the customer happy” serve as the best possible building blocks for our planning, the best possible drivers for our work. A focus on making our customers happy is the way to go. During our development efforts, we will then be able to do the necessary amount of analyzing, designing, testing, kickoffs, etc.
Layers
Here’s another way of looking at the planning. This is a more ”what-do-we-need-to-build” kind of plan.
- Setup loadbalancing servers
- Define and program the business logic for bank note combinations
- Build the user interface
- Build databases – based on information modeling
- Set up backup system
- Transaction log
- Hook up ATM system to banksystems
This is also not the way to go.
Despite the fact that the above are all ”chunks we need to build/develop,” they are still not a good way of breaking down the work we need to get done. Why? Because none of the above chunks are, by themselves, making any customer happy. By following this strategy, we could build the most wonderful user interface, have the users check it out and maybe even love it, and then later find out that the bank-systems we’re hooking up to do not have the information we needed for the user interface. Or we could create a state-of-the art database structure and connect it to the bank backend systems with great interfaces, and then build the user interface and find out that some piece of information that the user really, really wanted to see (e.g., which ATM did I last use or which amount did I withdraw?) was not stored anywhere.
Again, don’t get me wrong, I know that all of the building blocks in the above list are necessary to develop, but they are not the best building blocks for your planning. They are ”layers” in the architecture – and a layer by itself does not make any customer happy./filters:no_upscale()/articles/making-scaling-agile-work-2/en/resources/1figure2-1509136389020.png)
Henrik Kniberg’s wonderful illustration is one more way to see why Layers (or building component-by-component) is not the way to make your customers happy.
Slices
Finally, here’s a third way to look at ”what to do.”
- Withdraw cash – debit card
- Withdraw cash – credit card
- Transfer money
- Check my balance
- Deposit cash
- Withdraw cash EURO
- Withdraw cash USD
This is what we want!
A good way to get to this way of slicing is to have “Who will use the system, and what will they be using it for?” as driving questions throughout our slicing.
This is the kind of break down that makes a good plan. Each of the items on this list is something that can make a customer happy. And they are, to a large degree, independent so you could develop one of them and release it, and fulfill a customer need.
Organizing what you want this way enables you to have the best possible basis for making a plan that drive your development efforts towards ”making our customers happy”.
Again – Henrik Kniberg’s illustration provides one more way to understand why slices can help us find out what to do to make our customers happy.
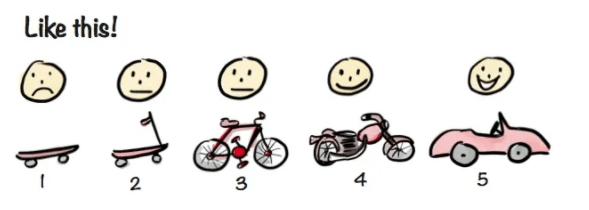
Refer to Kniberg’s blog if you want the full story: making sense of mvp
The how-to’s of slicing and understanding together
Now that we have covered the importance of slicing right to deliver value to our customers, let’s focus on how to slice, and at the same time build a common understanding. Here’s the how-to’s that we will cover in the reminder of this article:
- Understand together
- Determine how many slices/epics
- Try use cases instead of user stories
- Go deeper with use case camps
Understand together
First of all, never have someone write the requirements on their own. In order for the slicing to produce a good starting point for the master planning, it is critical that there is a common understanding of the content of the epics.
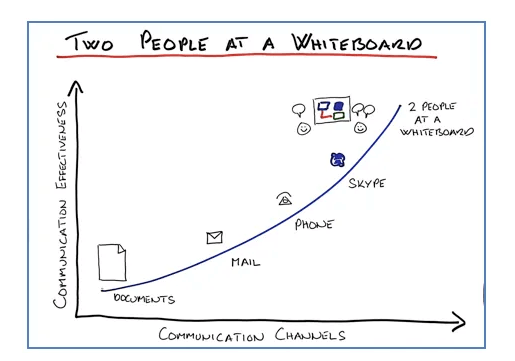
As shown in illustration Two People at a Whiteboard, we know that the best possible way for humans to understand each other is when they’re face-to-face, for example by a whiteboard.
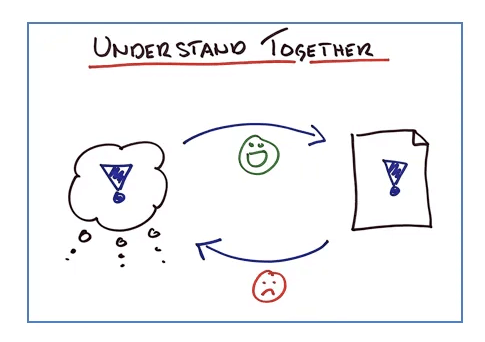
The illustration Understand Together shows two different ways to represent an understanding. To the left, the understanding is in people’s brains. To the right, the understanding is written in a document. It is infinitely more efficient to start by helping people create a common understanding in their brains by talking, discussing, illustration (Two People at a Whiteboard) – and then write down what they agreed (going from left to right).
How many slices/epics?
In our experience, the right number of epics – where each epic is one slice of the system – seems to be 20-30 regardless of the size of the system. If you have fewer, you’re probably not deep enough in understanding the requirements.
If you have more, you likely have too many details at this point, which will make your master planning confusing, not creating the overview you want. In addition, it will not leave enough space for decision-making for all the people in the big room planning – thus jeopardizing the feeling of ownership from the people who will actually build the product.
Epics in a larger program will be bigger than epics in a smaller program – and that is completely okay. In both larger and smaller programs, having 20-30 epics has proven to work best.
So if you have too many and too small epics, you need to cluster some more detailed epics into one bigger epic. Story mapping, described in the first article in this series, is a good technique for that.
If you have too large epics, you need to slice them thinner. One example of a thin epic in a travel booking system is a limited early epic that only allows you to book travel if you want:
- a one week trip – Saturday to Saturday
- two people in a double room
- staying at Hotel Palma de Mallorca
- paying with a Visa credit card
- flying economy
While there is always some groundwork before you can get the first actual release out to your customers, this way of thinking minimizes the amount of groundwork, and also minimizes the time until you can get your first actual feedback loops going, making it possible for you to know (not just think, but actually know) whether you’re on the right track to delight your customers.
In the above example, we would actually build and release the solution specified, with a very small amount of potential business, but with a potential goldmine of learning opportunities via feedback loops from the actual use of our system.
Try use cases instead of user stories
Agile and Scrum brought a different format for writing requirements: the user story. An example is:
- As a bank customer, I want to withdraw cash from my account, so that I can buy things from people who only accept cash.
Seen in isolation, this is a nice and brief way to write a requirement. It even keeps us from going in too much detail at this early/general level.
Now, consider this user story:
- As a bank customer, I want to key in my own personal 4digit pin code, so others cannot get access to my account.
Suddenly we are very detailed, and now have two overlapping user stories on two very different levels. And while there are guidelines to prevent this – including INVEST (stories should be Independent, Negotiable, Valuable, Estimable, Small and Testable), I quite often see people end up with stories that are overlapping and very different in the level of detail, which leads to a sometimes serious lack of overview. This challenges the common understanding and often leads to programs with no predictability or transparency.
What can we do about that?
There’s a different way to structure your requirements. It will bring back the predictability and the overview, and it will help you slice right. It’s called use cases, and though many have learned and used this requirement modeling technique, it seems forgotten for the most part. Use cases sound very similar to user stories, and while they have similarities they also have big differences.
Use cases were introduced in the ‘90s and became very popular, and maybe somehow connected to waterfall development, and therefore got a bad reputation. Use cases do, however, offer a firmer structure and an overview, which is what many agile programs need.

Use cases have four easy-to-understand guidelines to help determine whether you have a real use case on the right level:
- A user can do it in one sitting
- A user can do it in 2 – 10 minutes
- It is natural for the user to take a coffee break after doing it
- It provides value to the user
Over the years, I have seen several Agile programs re-create the overview and common understanding, and thereby the program’s transparency and predictability, by remodeling all their requirements into use cases.
There are three things in use cases to drive you toward epics that are actual slices, which are potentially releasable to your users:
- Giving the use case a name, preferably a verb and a noun (e.g., “withdraw cash”)
- The above mentioned four guidelines, with the coffee break test as my favorite. (“Yes, it does make sense for the customer to have a coffee break after withdrawing cash.”)
- The use case diagram, where you draw both the user and the use case (see illustration use case diagram)
A quick summary of the reasons to consider use cases instead of user stories:
- Use cases provide a structure that user stories don’t
- Use cases drive you toward slices and potential releases to your users
- Each use case has a name, to help you with the overview
- The use case diagram gives you a onepage visual overview of the whole
- The guidelines for when you have a real slice, a real use case, are easy to understand
Go deeper with use case camps
So, what is a use case camp?
The very short answer is: a use case camp is a facilitated requirement workshops with participants from both business and IT.
A little longer answer: it is 10% use cases and 90% workshop/facilitation. Participants discuss how the user will be interacting with the system, and because both the user’s perspective and the system perspective is in play, it sparks substantial and passionate discussions, where all stakeholders are involved in creating the overview and the sliced epics together.
Interested in trying a use case camp? Here’s the how-to:
A. Set the stage
Depending on what has been discussed and decided on earlier in the project, someone needs to set the stage… An inspiring talk about the program, the scope and the benefits we’re about to create.
B. Brainstorm use cases
After the introduction, split the participants into groups of three to four people – with business and IT people in each group – and ask them to brainstorm use cases on sticky notes.
This step can be supported with documentation about scope, processes, and business goals that have been produced earlier in the project. Strange enough, we often see that the participants do not use or need these documents. They seem to have a better understanding and knowledge than the documents offer.
When the brainstorming is over, the groups post their notes on a poster on the wall. No grouping or ordering is needed. Actually, it is better if they do NOT order or group at this point because this can lead to discussions that fit much better in the next step.
C. Use case diagram & brief descriptions
This step is where we start getting to the meat. We are still at the overview level, but we always get deep discussions and new insights during this step. This step usually takes at least half of the use case camp. Between one and two days for this step is a minimum.
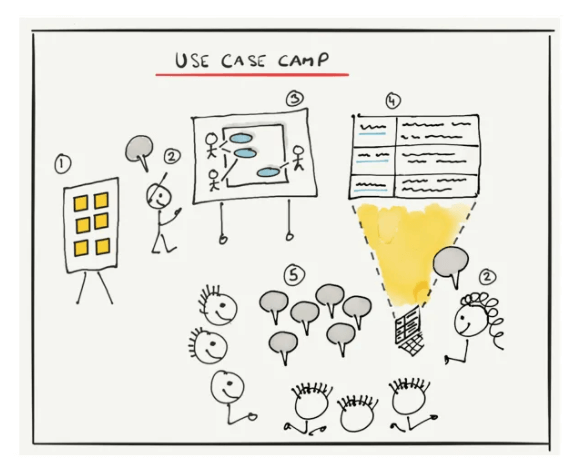
Explaining the illustration ”Use case camp”:
- First, get the participants to pick one of the sticky notes from step B ”brainstorm use cases”. Check if other sticky notes are related, and include them in the discussion.
- Then as the facilitator, together with the co-facilitator, get people to agree on a name for this use case, eg. ”witdraw cash”.
- Add the use case to the whiteboard together with the user role, the stick fiture and the name eg ”bank customer”.
- The facilitator and the co-facilitator now work together, ready to type and display what the participants agree upon.
- Now everyone is discussing the use case while the facilitator is in close collaboration with the co-facilitator, who is typing, and getting everyone to agree on two or three sentences that describe the essence of the use case.
This order is important, because it creates an intense focus on one thing at a time.
We have found it essential that the room and the AV tools are exactly as shown on the illustration.
- Left: the sticky notes from the brainstorming
- Middle: a whiteboard for drawing the Use Case diagram, as we go (must be a whiteboard, because we change things over and over again)
- Right: the brief descriptions projected on the wall
D. When you’re done
When you’re done with all the sticky notes and you have your use case diagram and a brief description for each use case, you have not only sliced your requirements right, you have also created a common understanding among all the participants in the use case camp, and thus you have a number of ambassadors, who can go out and cast light over the entire program with this overview and common understanding.
Summary
The difference between slicing right and wrong at the program level can have major consequences for the success of the program and even the business.
In this article, I’ve shared why and how to slice right – how important it is for the entire program – for common understanding, for predictability and transparancy, and for success.
You can create more structure in your requirements by working with use cases rather than with user stories. And you can create a common understanding at the same time if you decide to model your requirements together in a use case camp.
Product
Making agile work
Pragmatic Agile support aligning purpose and ways of working to anchor change.